 Do you have any idea how many times a day that lyric repeats itself in my brain?
I know someone who does & according to her, when she introduces herself to complete strangers mind you, SHE “is the REAL Elsa!”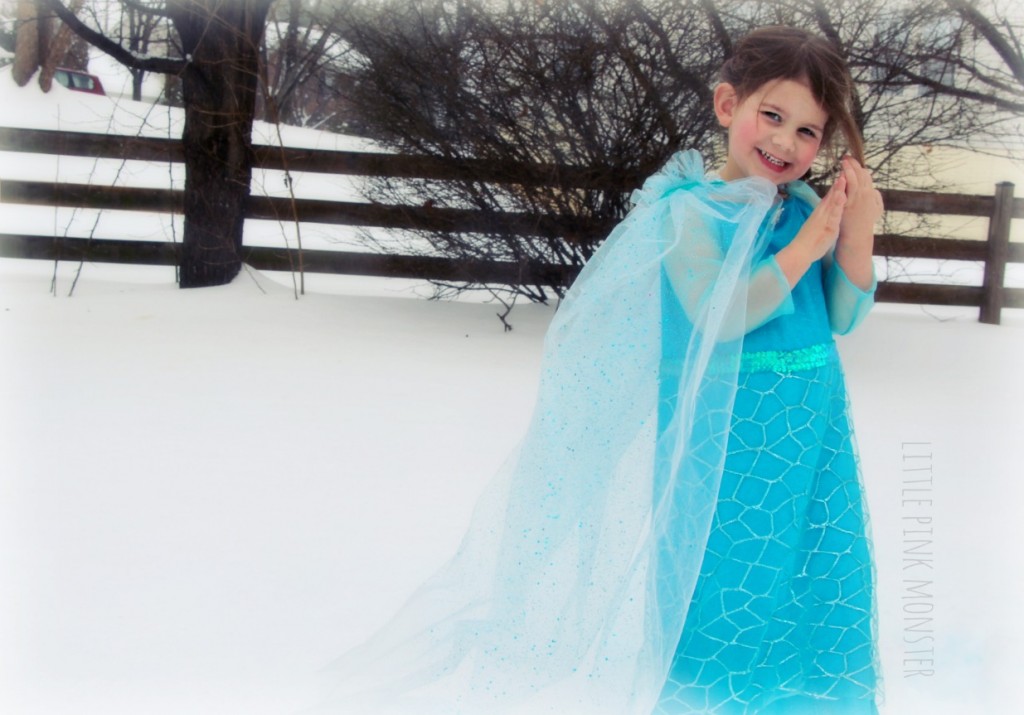
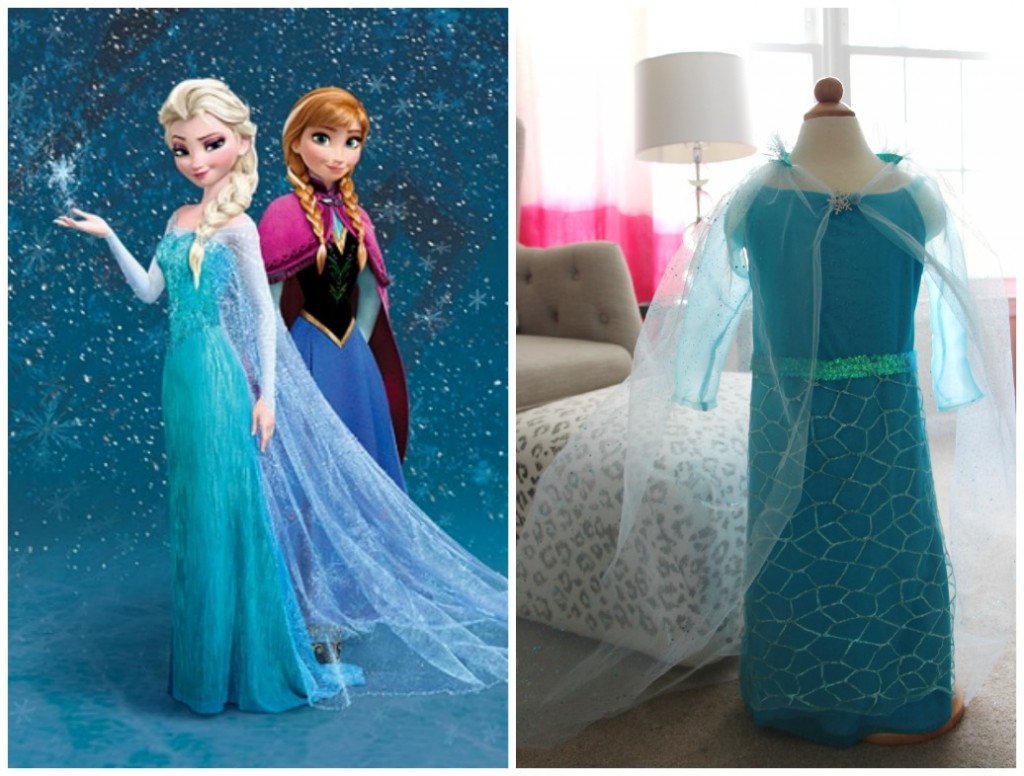 Let me preface this tutorial by saying that when it comes to posting the directions for dresses that I make for my girls it can be a bit tricky. The problem is, I totally wing it. I’m one of those people who wakes up in the middle of the night with crazy ideas, I picture exactly how I want to create something in my head & then figure it out as I go. The problem is then when I try & regurgitate what I did in an instructional form such as this, well, it can get a little confusing for those of you who actually have some legit seamstress street cred. However, I will do my best to walk you the crazy creative process my brain takes.
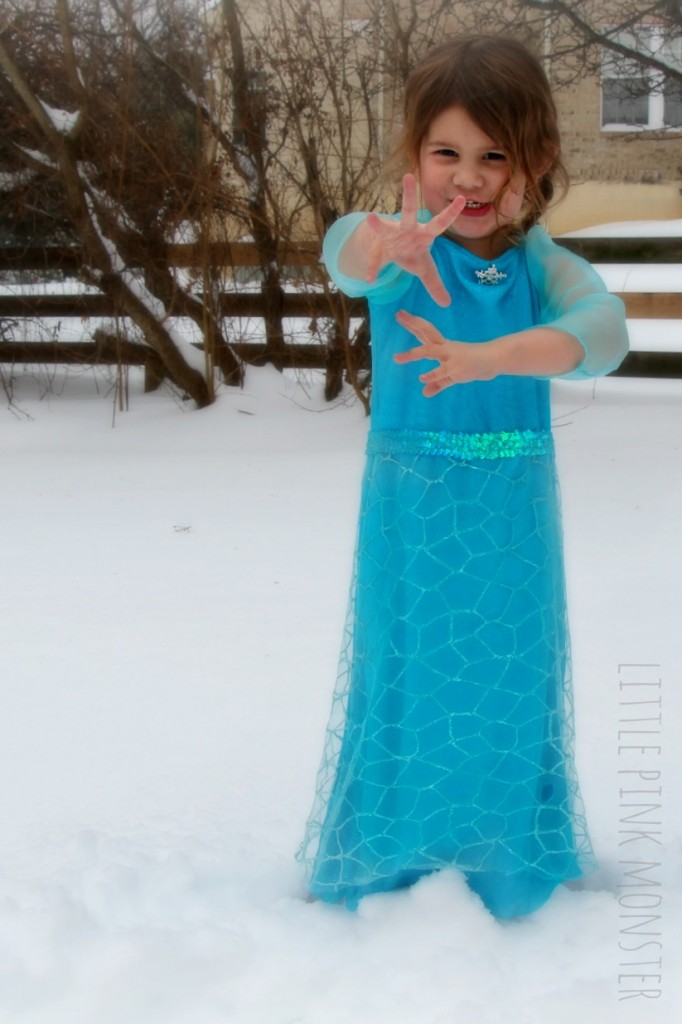
Elsa’s dress in the movie is incredibly gorgeous, quite possibly the best Disney princess dress yet, but not in your typical poofy princess kind of way, it’s slinky & sassy. When she walks it gives her a bit of a Jessica Rabbit feel. Translating that look for a three year old without going total honey boo boo could be tricky but I decided the best way was to go for an a-line, somewhat empire waste style.
For pattern inspiration I dug through our dress up stash & ended up using the girl’s old mermaid costume. By turning it inside out I was able to see the seams clearer & therefore eyeball what shapes I needed to cut out for the skirt & the bodice. *Tip* The finished bodice gets it’s shape from some thin elastic that runs across the top, to know what the bodice shape is un-stretched I pulled it taut & actually pinned it to my livingroom rug with some stickpins. We’re all pro around here.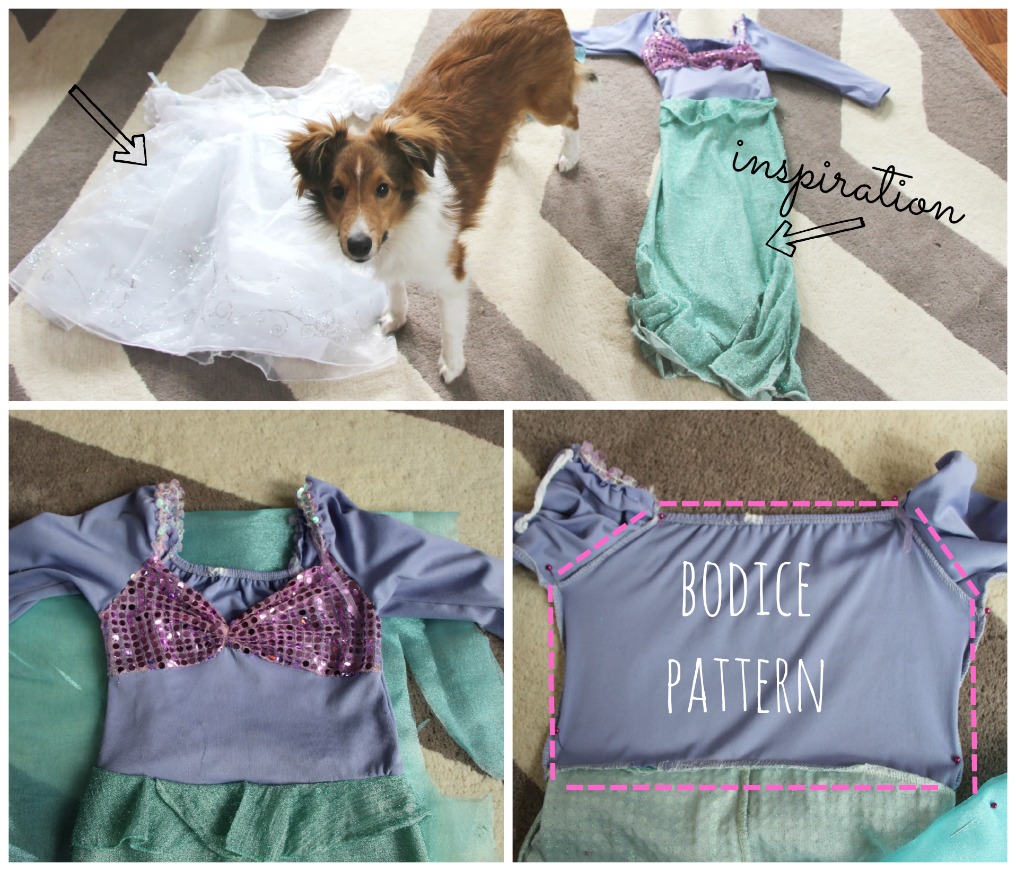 You’re going to need two of the bodice pieces (one front & one back) from each piece of fabric. In my dress I used a soft baby blue knit for the lining & a sparkling lycra blend for the outside. Since this dress has no closings (zipper, buttons, velcro…) it’s important that it can stretch over little heads. If you tug on your fabric you’ll notice it stretches in one direction more than the other, make sure when you’re cutting your pieces that it stretches horizontally. If you’re not sure what I mean by this just test out a piece of clothing you own & you’ll see. Often with dresses the front & back bodice pieces are the same size except the front piece has a neckline that dips lower, that’s no so with my dress because the back is somewhat low as well but differentiating them might be something you want to consider for yours.
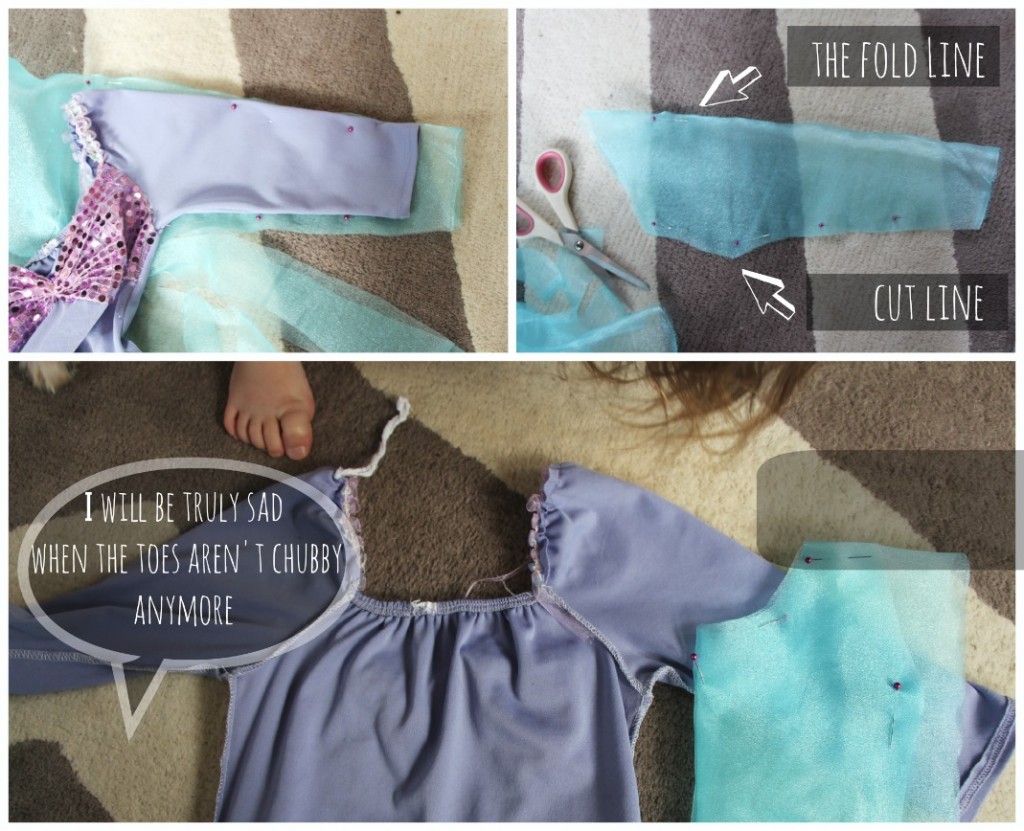
Now it’s time to cut, just go slow, try not cut your inspiration dress unless you don’t want it anymore, & be sure to give yourself 1/2″ seam allowance on all sides. If you’re super nervous you can mark out your cut lines first with a disappearing ink pen. For my dress which has a lining & outer piece I ended up cutting out 4 bodice pieces in total.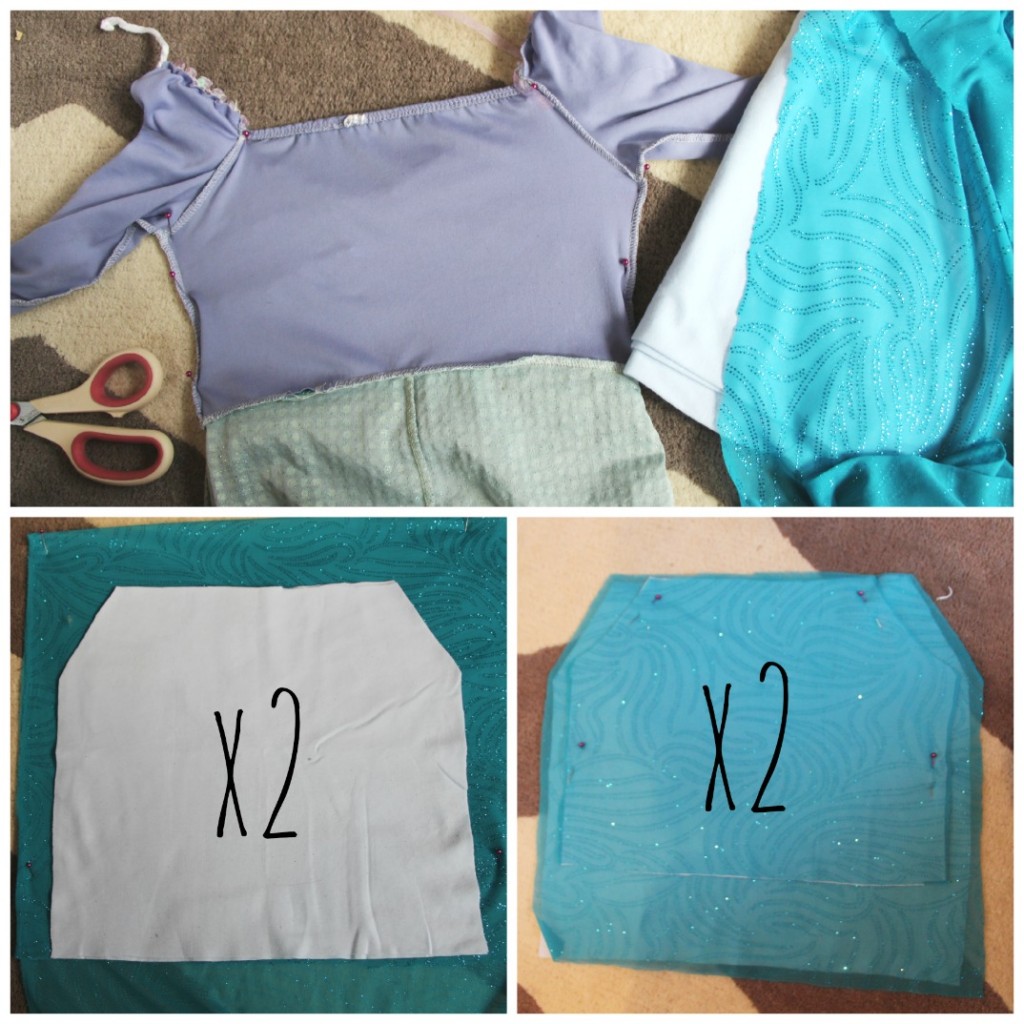 I like to cut all of my pieces at once so next let’s get those sleeves out of the way. Sometime sleeves can be tricky because you have to line up the armhole size/slant along with the curve where the sleeve attaches but since this dress doesn’t connect at the shoulders, it’s more like a peasant top, this isn’t so much of an issue. I followed the same process as with the bodice…Trace, cut, repeat for second sleeve. The only difference with the sleeves is you’re not going to be cutting along the the fold line.
 The mermaid skirt has 3 pieces which I’ve actually never done before when making skirts but am going to try this time since I know the mermaid costume wears well. Separating the back half of the skirt portion into two pieces that are then sewn back to together might seem a little, well, dumb but I believe it gives the wearer a bit more wiggle room verses if you just sewed a front & back piece. (please comment if you know otherwise!) Once again I used the inside out costume as my guide & cut the pieces out with an extra 1/2″ for seam allowance. I also took a little artistic liberty & cut more of an A-line down the outside line verses the flared mermaid tail. I got a little crazy with the skirt fabric, it has three layers. Yup, THREE. The baby blue knit lining, the royal blue shimmery lycra-ish fabric & now this amazing netting I found at JoAnn’s that has an aqua glitter design that reminds me of the “frozen fractals” on her dress. (if you listen to the Frozen soundtrack in your car like me than you too will have added ‘fractals’ to your vocabulary. You’ll also hear it in your dreams and at the grocery store and in the shower. It’s ok though, BEST SOUNDTRACK EVER) Ok, back to the dress! Another point, the netting doesn’t stretch so keep in mind that the skirt has to be roomy enough to walk, the adding of width towards the bottom (when we negated the fishtail shape) takes care of that problem.
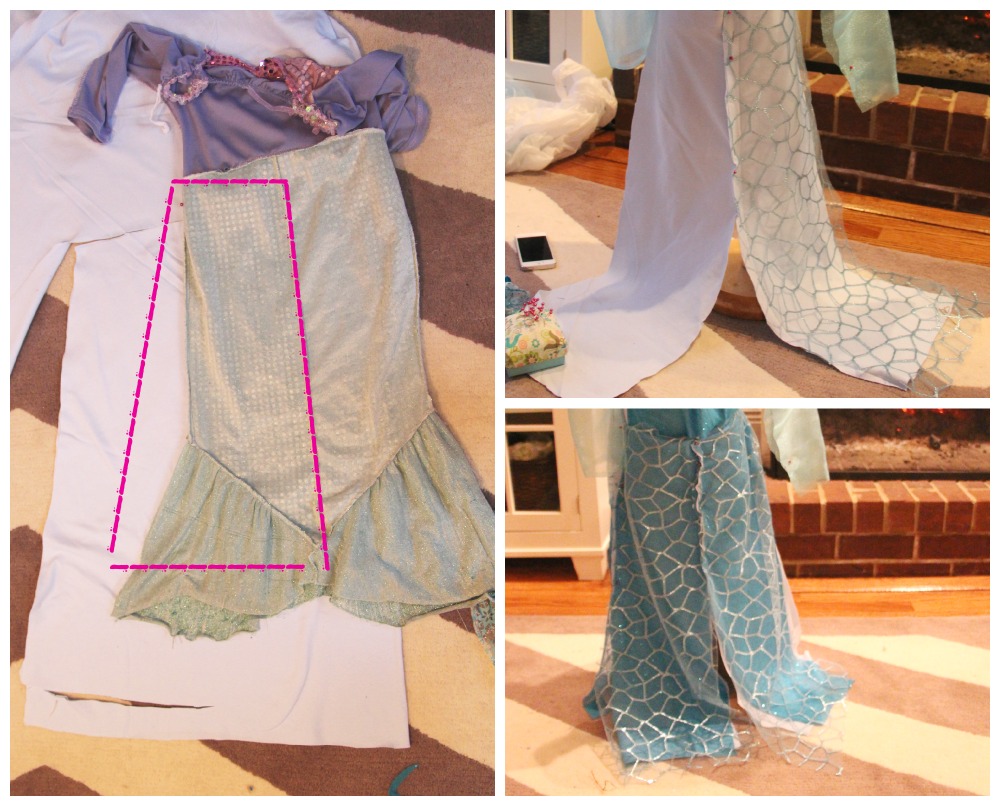 At this point if you’re using the same amount of layers as I am you should have 2 front bodice pieces, 2 back bodice pieces, 3 left back half skirt pieces, 3 right half back skirt pieces, 3 full front skirt pieces & two sleeves. Whew! I really need to do this in a video format next time, explaining in writing is so hard! Would you guys like that better?
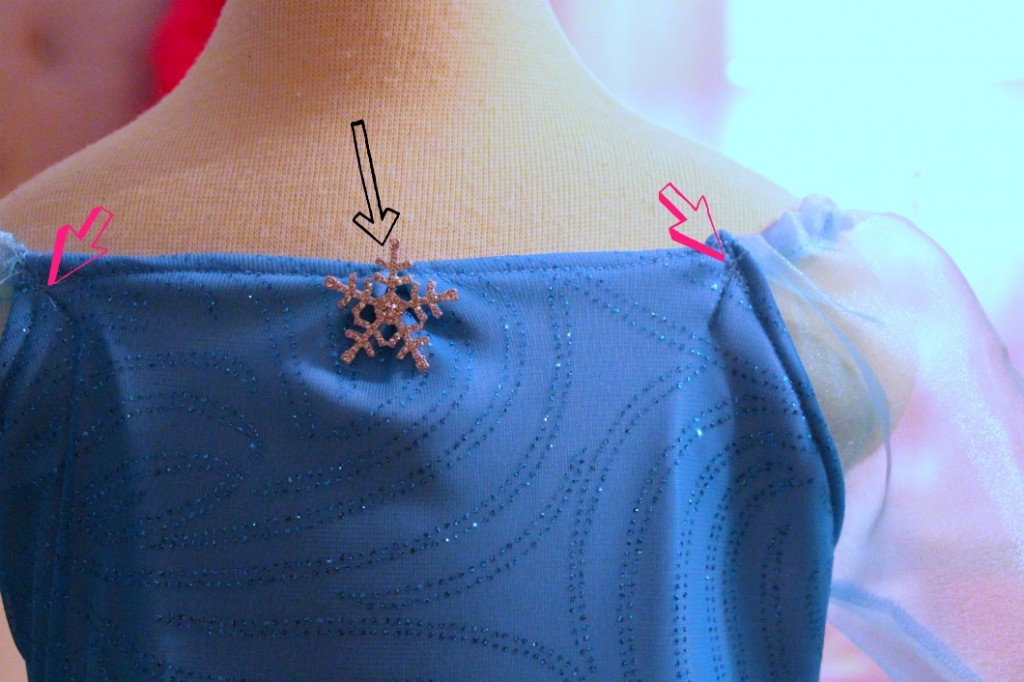
Ok, time to assemble! This will be easier than you think. First I attached the the lining & back bodice pieces to one other with a running stitch just along the very edge to hold them together. I only did this to make life easier & avoid fabric slipping, you don’t have to but I recommend it. Now it’s time to attach some sleeves, open the sleeves up (remember how you cut them on the fold?) & pin where the armholes meet up with the fabric. (right sides together!) Stitch in place. *tip* if you need help sewing your first dress with sleeves this is a great pattern & helped me a lot when I was first learning!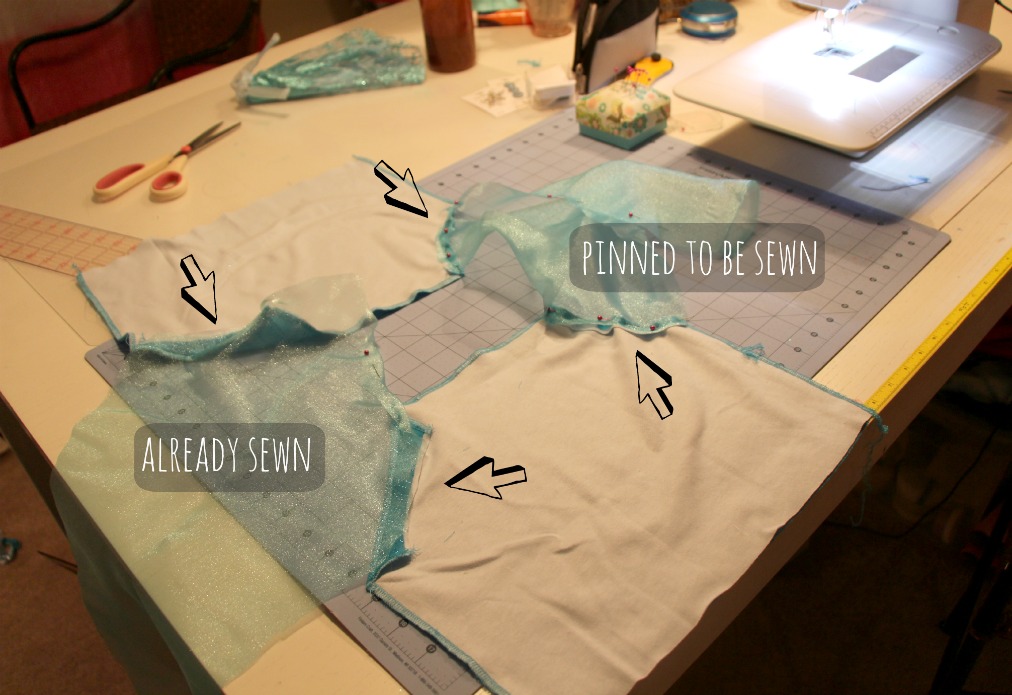 Next you’re going to fold the two bodice pieces together (right sides together) & you’re going to stitch from the bottom of the bodice, up to the armpit & down the bottom of the sleeve. Repeat on the other side. Now when you turn you’re bodice right side out it should be a nice little top! One more step & then we’re on to the skirt. You’ll need to sew a thin casing that runs from where the sleeve meets the front bodice on each side. Only the sleeves & back will have a casing, although when you get to the front bodice area keep stitching so it’s hemmed, it just doesn’t have to be as wide as the casing is for the rest of the top edges. I chose to nix the casing in the front because I wanted the front of the dress to lay flat, some elastic is needed around the top however to keep the darn thing on! Since we’re avoiding zippers & all. Hopefully the picture below will help. The pink arrows are where the casing begins & ends. I wasn’t sure how much elastic I’d need (I think my elastic was 1/4″ thick & the casing was 1/2″ thick) so I stitched it down where one of the pink arrows is, made a little hole in the casing, attached a small safety pin to the end of the casing & then fed it through all the way to the other side. I pulled on it until I was happy with how snug it was. This is where having a dress form can come in really handy, I bought mine on ebay. Once I was happy with the fit I stitched down both where the elastic in the casing ended & also where it began. (noted by the pink arrows) The final step for the bodice is a little pulled in pleat in the middle (the black arrow) & then I attached Sophie’s favorite part of the entire dress, the crystal snowflake button, right in the center. (I found it in the button section at JoAnn’s)
 Skirt assembly time! This part will be much faster! All you have to do are three things…
1) With the right sides together stitch shut the two back pieces
2) With right sides together then stitch the ‘new’ back piece to the front piece
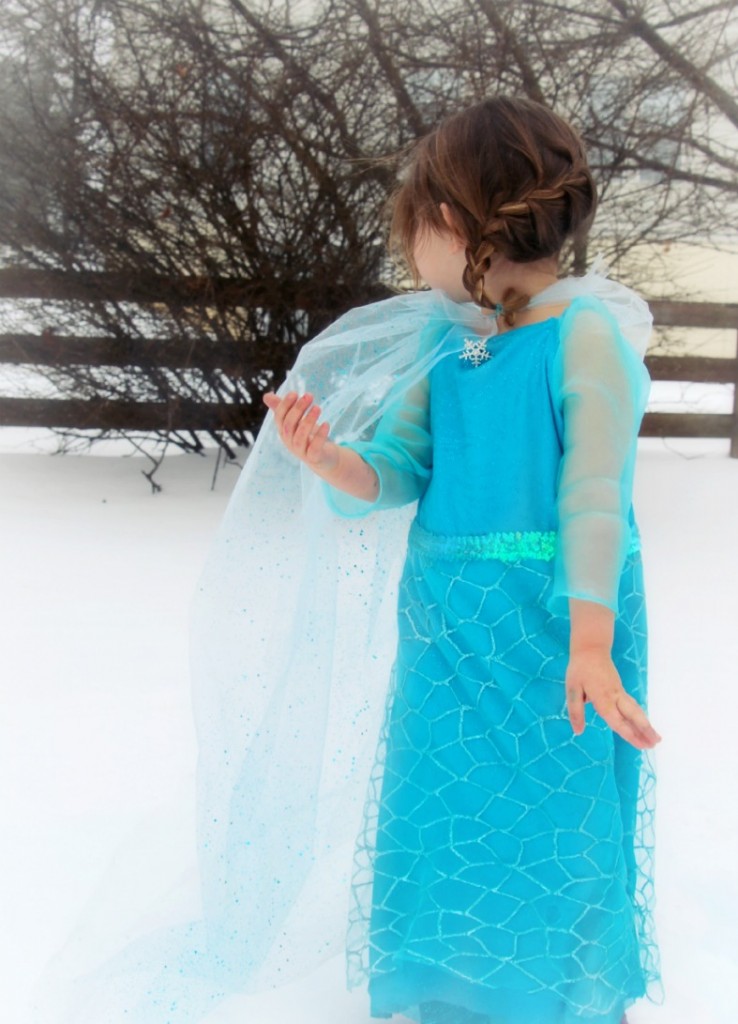
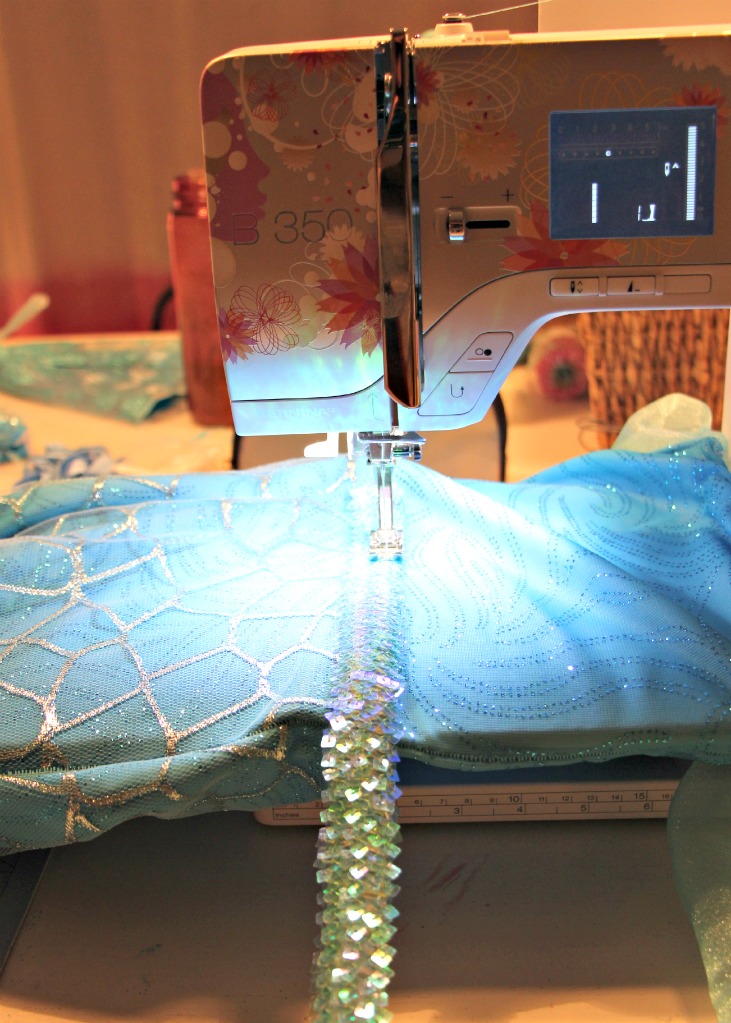
3) Attach the skirt to the bodice by turning the skirt inside out & putting the bodice right side out inside of the skirt, then sew around the seam. Was that not the most confusing sentence ever?? I don’t have a picture of this with the Elsa dress but I did have one from when I used the same technique to attach a ruffle bottom to The Gameday Dress I did last year. Hopefully this visual helps…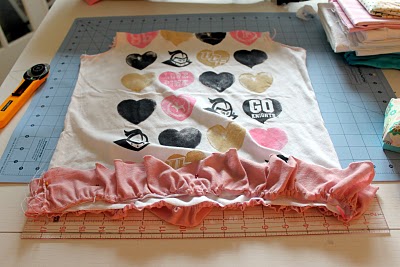 For whatever reason Sophie specifically asked that Elsa have a belt. She’s REALLY into belts lately. Luckily for her mommy has a giant stash of the most random craft leftovers & this icey colored sequin trim was in there! I simply stitched it around the dress right on top of the bodice/skirt seam. (this one looks like it might be pretty similar, mine is elastic too)
 The last piece of the costume is Elsa’s cape. I was pretty torn about this one. If you look at her dress in the movie she has this magnificent flowing sheer fabric that drapes behind her, I thought it was a cape but up close you can see it’s actually attached under her arms. Hmm, peculiar.
 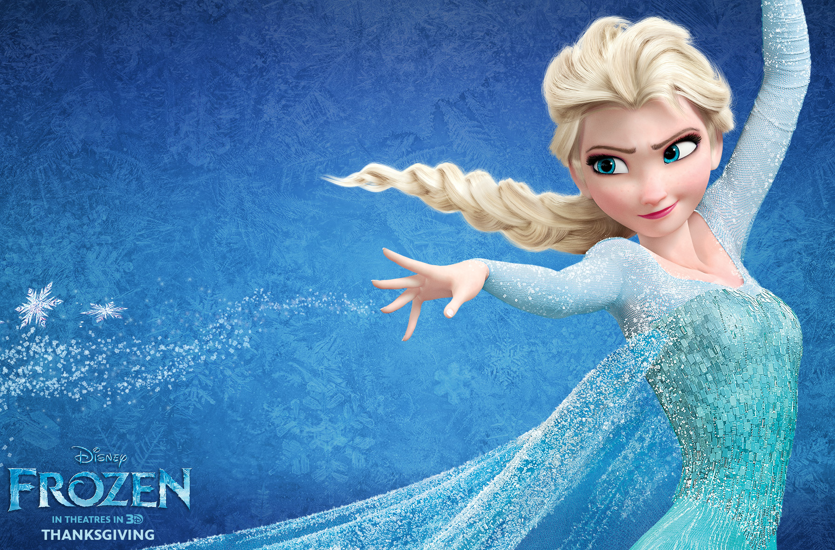 Beautiful but kind of awkward for real life, right? I know Sophie, when she gets a dress she loves she wants to wear it EVERY SINGLE DAY for weeks on end. Including to the grocery store or anywhere else we might be venturing to, an attached train was not going to work. Can you imagine trying to buckle that mess into a carseat? So I opted for a removable cape. Once again I got seriously lucky with the selection at my JoAnn’s because they had the most amazing netting that had blue sparkle dots randomly sprinkled all over it. All I did was pin it to the dress form, spread it out until it looked good & cut the length with a nice semi-circle edge.
 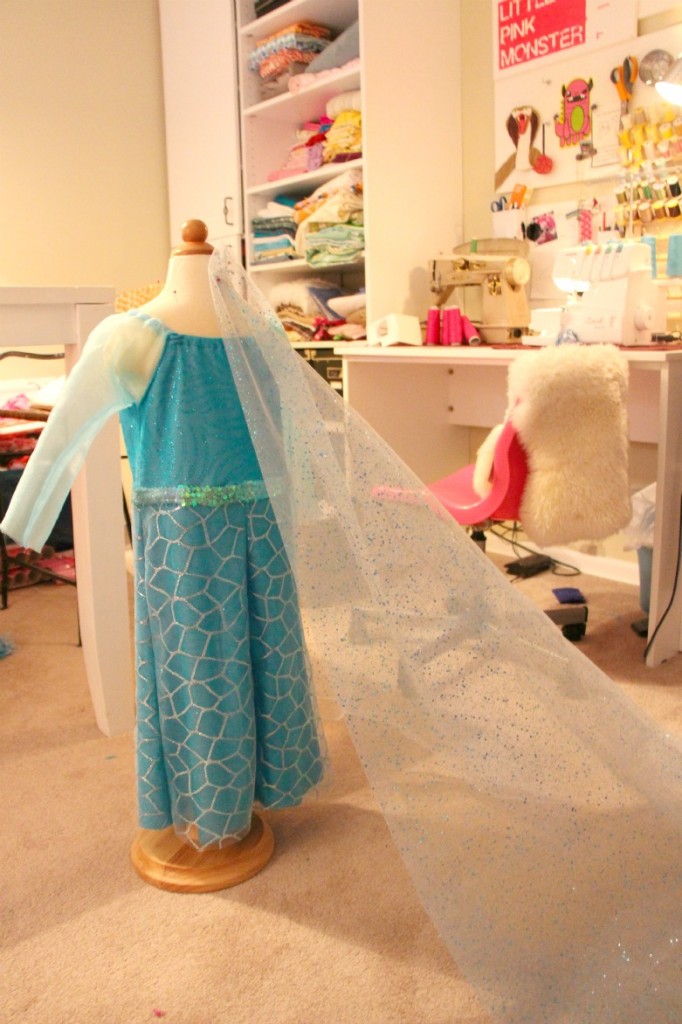 I gathered up the top of the cape by hand & then stitched it into place. Come to think of it the gathering & trimming is very similar to the floral wedding veil Sam & I made together. (LOL, the first picture on that link still cracks me up every.single.time.) For a little formality & to cover my less than perfect stitching (by this point I just wanted to go to bed) I stitched on some lovely ice blue velvet ribbon to both the inside & outside of the gathered seam, I love how the doubled up ribbon really gave it a collar shape! The closure is simply a stitched on loop of elastic & a pretty blue button.
That’s it! Now all you need is a little girl who was born with a weird curse that could potentially kill her sister or just give her really cool highlights. Thank goodness for troll kisses!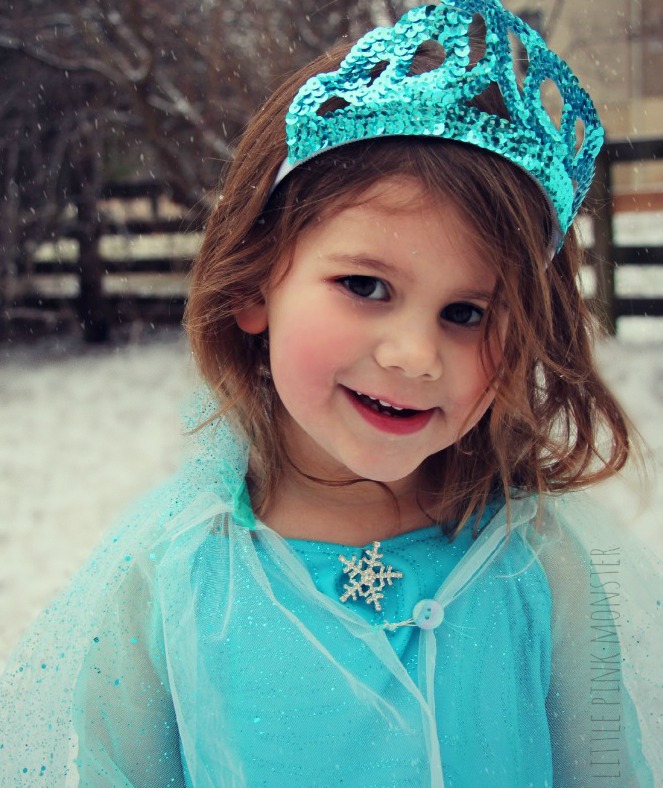 UPDATE: I’m glad I didn’t spend too much time on the cape because the kid never wears it. The elder on the other hand was more than happy to step in…
There you go my friends! Elsa from Frozen, I’m sorry it took so long to get up, even though it came together quickly this was quite the project to write about!
If you love this want to see something truly amazing, while I was googling for inspiration I found this girl’s blog who sews magnificent costumes for cosplay, take a look at what she made for herself!
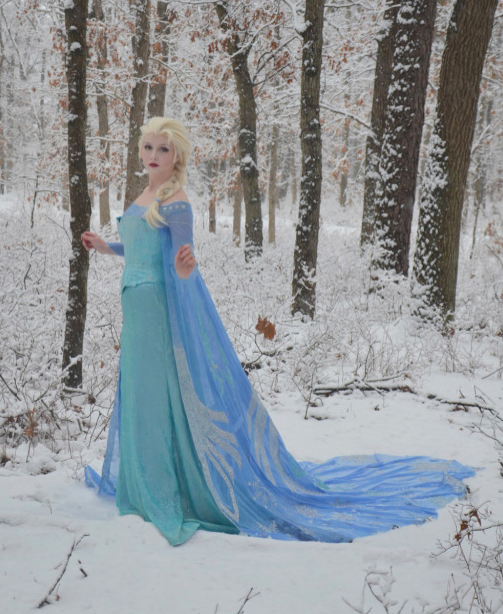 (img via http://doxiequeen1.wordpress.com/)
STUNNING! Take the time to look, I believe she hand placed something crazy like 60,000 itty bitty swarovski crystals onto the snowflake cape! Can you imagine?! HA! Can you remember having time like that???
If you have a second please share my Elsa post with one of the buttons below, that’s my new social media bar. Sounds like somewhere I could get a fruity cocktail doesn’t it?


i’m still here…as excited as ever when i see you’ve posted.
(: Thanks Stephanie, now I feel silly!
don’t! i would have thought the same exact thing.
I love this! It’s beautiful and Soph is a great model, your very talented.
Stinkin’ cute! Sophie has the best personality – must be a baby sister thing, I have it too
Ok so tell me, how did that crazy little personality work out when you were a teenager? I’m scared! (:
Wow this is beautiful! The dress turned out great. You really have an eye for crafting.
This is awesome! I am always impressed with your DIY projects and admire your skills as a mother. Your daughters are beautiful and are very lucky to have such a great mother. I always look forward to your posts.
Aw thank you Danielle, that is a very very sweet compliment. (:
I love it – wouldn’t mind it for myself But I have a son and couldn’t sew if my life depended on it. Am commenting to just say hi
Well thank you Emma, “hi!” right back at ya!
Beautiful….now to learn to use my sewing machine! haha!
Omgosh, do you know how long mine sat that unused because I was scared/intimidated to try? Same thing with my serger, it’s so silly because it’s actually really simple. I say go for it this weekend Jayme!
This is an awesome post! I have a 9 month old boy right now but I hope to have a little girl next so I can start making her the clothes I have been seeing you post on here since you started! I know he will love if I make him some of the capes that you have made Sam and Sophie! (Just with some minor modifications lol)
Totally! And he might be a bit young now but when you’re ready I did post this during the tutu drive forever ago that has a tutorial for superhero capes (: http://www.littlepinkmonsters.com/2010/06/29/tutu-drive-superhero-capes/
That looks awesome! I can’t believe I forgot about that post! Thank you!
I really didn’t know you had put it up and I was waiting. I’m glad no one commented so you mentioned it again. Haha. I think you are awesome and so is that dress!!
Lol, well that’s a good thing to come of it!
I love it!! Makes me wish I had girls:(
Ack!!! So cute!!! Teal is my favorite! We’ve yet to watch frozen but I know Azy would fall in love with this all the same!!!! ^_^
YOU HAVEN’T SEEN IT YET?? Every adult I know who’s seen loved it as much as I did, serious kudos to Disney!
I like the dress! I wish I am creative/ good in crafts just like you! *jealous*
You’re simply awesome! I would love to give it a try… The problem is I don’t have girls lol
You should totally just make one for yourself Fabiola. That wouldn’t be weird at all! (;
Love this! I would love to make one for my daughter..but with a newborn, I thjnk I will have to hit up the Disney Store! Did you guesstimate how much fabric you would need???
Oh! What a good question, can’t believe I forgot to mention that. SO, I bought WAY too much fabric, I have this fear of not having enough which causes me to waste a lot of money. All that to say I bought 2.5 yards of each fabric. In hindsight I’d say 2 yards of the knit layering & blue lycra-ish would suffice, for the cape it’s however long you want it to be (I would say 1.5 yards would be plenty) & for the skirt overlay 1-1.5 yards would work.
Beautiful! I love it!
The dress is adorable and Sophie is very cute in it :-). I read your blog all of the time and hardly comment. It’s just not in my nature. I do have to say that I’m not a mom and also not much of a crafter, but ironically, I feel like I can really relate to you. One day I hope that I am as awesome of a mom as you.
That’s very sweet Sammi, I have a feeling you will make an incredible mom! Thank you for reading, especially since you don’t have kids (yet) & aren’t a crafter (yet!), that’s a huge compliment & I’m very grateful that you choose to spend some of your time here!
I’m here, I’m here! Sorry I’m late but I’m here, haha! Sophie monster is the cutest and you can tell she was super excited to be wearing it. This tutorial (and many other girly ones you’ve done) makes me wish for a girl if hubby and I are courageous enough to go for #3 in a few years. Love you tutorials and your blog in general and of course you! Xoxo
Your girls are adorable! I have no children of my own [yet] but love the family friendly ideas you have on your blog.
Super cute! I’d never have the time or talent to do that, but my daughter would love it!
Have you thought about teaching a basic sewing class??? I have ZERO sewing skills, but I really want to learn. You seem like you would be a great teacher!
I like your Elsa costume. I am a professional maker and designer. I made the Elsa costume as well and I have to tell you I have never worked that long on costume like this one. Before I started I drew a lot. I was looking for the perfect fabric etc. You can find the link below. (Sorry my blog is not in English but the pictures speak themself.)
Regards
Katie (from Europe)
What an awesome mama you are! Beautiful dress on a beautiful girl:) I only wish I an a teeny tiny ounce of your talent.
Can I hire you to make one for me I’m not allowed near sewing machines haha
you have a sable sheltie? It looks like my dog (✿◠‿◠)
I just got home from Joann’s and am so excited to make my 4 year old girl an Elsa costume. I found everything I needed at Joann’s except a snowflake pendant. I scoured the store, but couldn’t find a single sparkly snowflake. I figured I would be adding it at the end, so I can look somewhere else and it wouldn’t hold up the dress making process. Do you have a flickr group for people to share pictures of things made inspired by your posts? I’d love to share my finished dress with you, once I sew it.
I found mine in the button section, not sure if I mentioned that in the post…
Also no flickr group but that’s a fantastic idea! Not sure how many people have actually made one though, regardless you’ll have to email me a picture when it’s done, I’d LOVE to see it! natasha@littlepinkmonsters.com
Do you make to order?
I don’t, I’m sorry ): Check out Etsy though, I’ve seen lots of Elsa dresses on there…
This is absolutely amazing. Thank you for sharing and the tutorial. I have two little girls that would flip if they saw this. lol. (and thank you for your honest and down to earth posts, love them!)
Awww, she looks likes the most adorable little thing. The dress is great, beats buying one in the store….or Ebay for a fortune, heh heh. Would love to meet your girls, they’re so cute, reminds me of when my 10 year old was that age.
Looking forward to ‘borrowing’ more ideas from you.