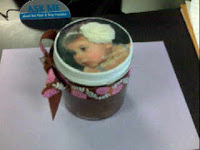
Having a baby has made me be a major procrastinator. Well, to be completely honest I was actually one before Sam so now let’s just say it’s even worse. I wanted to send out some inexpensive but thoughtful Mother’s day gifts that wouldn’t take a lot of time, that’s when I thought of turning my Brown Sugar Body Scrub recipe into a personalized gift by adding a photo label.

Sorry this is such a lousy picture, I realized while I was at the UPS store mailing these out that I hadn’t taken a pic of the finished product, hence the cameraphone photo. FYI- you can also make any photos below larger by clicking on them.
Below are directions for the lid, constructing the perfect bow & scrub recipe.
Be sure to make one for yourself too! I keep one plain jar (with no ribbon or label) in my shower and use it after shaving, it smells wonderful and leaves my skin really soft. Just rinse with water or also soap if you feel too oily.
PICTURE TOP:
For the picture I just added the text “Samantha Kate’s” along the top & “Brown Sugar Body Scrub” along the bottom. I used the program “Seashore” on the Mac but you could also use “Powerpoint”, “Picasa” or “Microsoft Paint”. Then I printed a copy for each gift, cut it out in a 2 in circle (or size of the lid of your container) and mod podged it right on. So easy! Just a bit of mod podge on the lid, place the picture, brush more mod podge on top and push kind of firmly with the brush strokes so you get out all the air bubbles. It dries to a nice clear finish and makes the image more durable.
I bought the jars here.
(This is also a place you can order supplies to make homemade body lotion)
PERFECT PERMANENT BOW:
Shape end of ribbon into the first loop of the bow as shown below, use a dab of hot glue to hold in place.
Next form the second loop and glue into place…
Here’s the trick, you make the knot out of a separate piece of ribbon, I use around a 5 in piece.
Tie ribbon piece in a loose knot, shape so that the piece of ribbon coming out of each side of the knot lies flat
Place a dab of hot glue on the backside of the knot and glue it onto the center of the bow.
Take one hanging piece from the knotted ribbon and wrap it around the back, glue down and trim off excess.
Take second hanging piece and pull it TIGHTLY around the bow, glue down, trim excess.
If you glued down the second piece tight enough it might have messed up the tails of your bow. That’s ok, it’s easy to reshape the tails and the loops so it all looks like you tied the perfect permanent bow! I also glued a strip around the top of the jar (be sure to smooth out the hot glue with the tip of the gun as you apply it, otherwise you’ll have noticeable bumps) I covered up the seam by placing the bow right smack on top.
BROWN SUGAR BODY SCRUB RECIPE
Combine all ingredients in a medium sized bowl and mix well with hands. This makes enough for 4 small jars.
2 cu brown sugar
1 cu raw turbinado sugar (you can substitute this for more brown sugar but the sugar makes the scrub extra gritty)
1 cu oil– start off with one cup and slowly add more until you get the consistency you like, I use olive oil since it’s good for your skin but almond oil would also be nice.
Essential Oils OR Extracts– I used a 1/2 a capful of almond, vanilla & peppermint extract. Once again start off with a small amount, you can always add more but can’t take it away!


I love this idea – I may make them as favors for all the mom’s at our mother’s day brunch on Sunday. Also, thanks for the great bow-making tip
That is blog dedication, taking it out at the UPS store, I love that!
All of your blog entries are so amazing! Very inspirational. I have started to sew a little bit and was starting to get a bit discouraged. You have made it seem possible again! Thank you for sharing all of your wonderful ideas, when you could so easily charge for this information like most everybody else does. I would love to find out which jar it was that you used on this project. I took a look at the website you provided, but they don't always have photos of each of their items, so it's hard to know which one, and I don't want to end up with one that has a cork for a lid
Also, you should think about making some items for boys, just because. I know you may not have a model (unless a friend or family member has a boy?…) but you have such a wonderful gift that you should venture out…you know…since we're all enjoying your tutorials so much and are actually learning more than we would in an actual sewing class (at least in my opinion) and not all of us have girls. Although, you have inspired me to just go ahead and baby girl items…just in case I have a 15 month old boy and would love to see what you could come up with for da boys. He needs some fashion! Haha.